• Welcome to the FREE TUGBBS forums! The absolute best place for owners to get help and advice about their timeshares for more than 32 years!

    Join Tens of Thousands of other owners just like you here to get any and all Timeshare questions answered 24 hours a day!
  • TUG started 32 years ago in October 1993 as a group of regular Timeshare owners just like you!

    Read about our 32nd anniversary: Happy 32nd Birthday TUG!
  • TUG has a YouTube Channel to produce weekly short informative videos on popular Timeshare topics!

    All subscribers auto-entered to win all free TUG membership giveaways!

    Visit TUG on Youtube!
  • TUG has now saved timeshare owners more than $24,000,000 dollars just by finding us in time to rescind a new Timeshare purchase! A truly incredible milestone!

    Read more here: TUG saves owners more than $24 Million dollars
  • Wish you could meet up with other TUG members? Well look no further as this annual event has been going on for years in Orlando! How to Attend the TUG January Get-Together!
  • Now through the end of the year you can join or renew your TUG membership at the lowest price ever offered! Learn More!
  • Sign up to get the TUG Newsletter for free!

    Tens of thousands of subscribing owners! A weekly recap of the best Timeshare resort reviews and the most popular topics discussed by owners!
  • Our official "end my sales presentation early" T-shirts are available again! Also come with the option for a free membership extension with purchase to offset the cost!

    All T-shirt options here!
  • A few of the most common links here on the forums for newbies and guests!

Any secrets to putting up crown molding?

MOXJO7282

Tug Review Crew
TUG Member
Joined
Jun 6, 2005
Messages
5,661
Reaction score
1,548
I have a 18x13 sqft den that I'm redoing and last redo I put that cheap plastic crown molding that was adequate at best. Now i want to try the real stuff. I have the right chop saw to cut the angles but have never done it.

First how hard is it? I'm doing to do it anyway because my BIL who is a carpenter but lives in a run down house because he isn't motivated said I couldn't so just trying to gauge the challenge.

Any secrets to doing it right? Someone mentioned their was tool that helps measure the corner angles to help make the cuts. Is that true?

I'm assuming i start in one corner and do the corner first. How big should the corner pieces be? 2 feet? or bigger? Any secrets with dealing with the seams other than don't put them in an obvious line of sight.

How about securing them to the walls. do i need a nail gun of some kind? I'm going to look on youtube for some guidance as well.
 
Get some pieces to practice on....cut it upside down and backwards.....believe me..it works

Sent from my SM-G900V using Tapatalk
 
It isn't that hard as long as you have a compound miter saw. It will easily adjust to the 2, 45 degree cuts to make up each corner. A nail gun that shoots finishing nails is helpful and keeps you from having to countersink each one with a nail-set. I wouldn't put butt joints at uniform spacing from the corners, but it isn't critical- you'll spackle and sand them before painting anyway. I think the biggest help is an extra pair of hands and arms to hold the pieces in place while you tack them down.

Nice DIY project that will give you a sense of accomplishment when it's done.

Jim
 
Air compressors and nail guns are great. Bought the compressor and several different nail guns when we retired 4 years ago. Also bought a good Chop Saw that bends several different ways and came with the stand with wheels. These all made it much easier when we totally remodeled a guest bedroom in our 99 year old house.
 
The inside corner coping saw cut seems like the big challenge and I have to do that 5 times. Another problem is I don't have the tools to do it properly. Darn I really wanted to do this but it might be above my ability just because it seems it's one of those things that the first time you do it it probably is a bitch.
 
OK I can see I can make the same cut with my saw with a beveled cut and not have to use a coping saw. I'm learning. I'm going to get a sample piece to play around with to see if i can manage it.
 
OK I can see I can make the same cut with my saw with a beveled cut and not have to use a coping saw. I'm learning. I'm going to get a sample piece to play around with to see if i can manage it.


First, make friends with YouTube. Don't waste that piece of scrap. ;)
 
Last edited:
My secret was: hire a pro.

A tip: be careful about where the water and electrical lines are. We accidentally punched a hole in a water line near the toilet when we were installing baseboards and it turned into a big leak.
 
As evidenced by my garage, "Any project worth doing is worth buying some new tools"
Exactly. I've paid for my tools many, many times over with the money I've saved via DIY.
 
As evidenced by my garage, "Any project worth doing is worth buying some new tools"

My Dad and I didn't always agree on much, but one of the life lessons he kept bugging me to remember was "When you need a tool, don't borrow it or jury-rig using something else. Go buy the tool, and the next time you need it, you'll have it." I have followed this rule my entire adult life, and I think he'd be proud of the tools I've collected. And now, when I need a tool for a project, Well, hey there! I already have everything but the talent to do it right! :D

+1 for the "Upside down and backwards" idea. Sounds nuts, but it does work, once you wrap your head around what that means. Makes for smoother cuts.

Dave
 
I like making pattern pieces of an inside corner and outside corner. So far, I have never found a perfectly square sheet rocked wall. There is usually a lot of joint compound used on the areas where the crown molding goes. I like to lay the molding flat on the miter saw with the top facing the blade. You will use a bevel cut at about 34 degrees and a miter cut at about 31 1/2 degrees for each corner. With the patterns you can tell if you need to add of subtract your degree of bevel or miter. If your staining this it needs to be dead nuts on. If your painting this you can fix your small goofs with caulk.

Newbies need to remember to watch your fingers, watch your toes, look up , look down, look all around, before you use power tools. Wear eye protection. Ear plugs are for sissys but if you can still hear then consider using some.

Good Luck

Bill
 
I like making pattern pieces of an inside corner and outside corner. So far, I have never found a perfectly square sheet rocked wall. There is usually a lot of joint compound used on the areas where the crown molding goes....

Bill
EXACTLY the case! If the walls were perfect, the job would go by the book. For 62 feet of crown molding, I can't imagine doing it without a miter chop saw. My thumb rule is purchasing a new tool is often considerable savings from having a contractor do the work. For the nail gun, you can rent the gun and a hand carry compressor when it's time to install the goods. Even then it is a challenge in locating the vertical stud to nail into. Nailing horizontally near the top of the crown is more of a problem. You need longer nails and a narrow target to hit the top plate correctly.

Even then you will need caulk to fix the gaps at the corner junctions.
 
Kal is right about the nailing. I usually install a nailer that we rip with a table saw. If you have a pattern for the molding you can see how big the void behind the molding is by placing it against the wall. The nailer needs to be slightly smaller than the void, like up to 1/4 inch smaller. This gives you a decent place to nail the crown molding . Without the nailer behind the molding you have to nail the edges at studs and joists and use glue. If you edge nail crown molding, occasionally it will split. Splits are easy to fix if your painting but stick out like a sore thumb if your staining.

Bill
 
...cut it upside down and backwards.....believe me..it works

Sent from my SM-G900V using Tapatalk
Absolutely correct! The problem is getting the cut to be precisely on the marked line. At that's if the measurements for the length are very precise. If not you get gaps.
 
My advice is to first make sample (practice) cuts using a short, plain piece of molding, so you can see what you're doing wrong, before trying to cut expensive, fancy stuff... Trial + error, going cheap on the trial.
.
 
Caulk is your friend for mistakes when you will be painting it.
 
Most houses don't have a perfect 90 degree corner. If you use and angle finder, they cost about $15.00 you can put in the corner and get the actual angle for each corner and /2 to get the degree for each side of the cut. Not sure about all miter saws, but I have a dewalt and they make a crown fence that mounts to the miter and holds your crown up side down at the correct angle to get the correct cut. It works pretty good...

Word to the wise... Its a lot easier to paint the crown before you install then liquid nail and touch up one installed. It will look best if you caulk to wall and ceiling. If you have a small gap in the corner just use paintable acrylic latex caulk. Use it to fill in the cracks and you won't even see them. Always seem pieces together with 45 degree cuts... Seems are less noticeable this way.

It is really easy to mess up a cut, by cutting the angle opposite that you want. I would take a piece of scrap crown and cut a left and right inside corner cut. Then a left and right outside corner cut if you have some of them to do also. Every time you measure a corner for the angle use these guides you made to visualize the cuts you are going to make. This will save you several linear feet of crown from mistakes or a lot of excess seams.

If you really want to cheat and it looks good too. You can get decorative corner blocks at hardware store and these go into the corners and crown just runs up to them without any angled cut in the corner.

Hope this helps some and best of luck.
 
My Dad and I didn't always agree on much, but one of the life lessons he kept bugging me to remember was "When you need a tool, don't borrow it or jury-rig using something else. Go buy the tool, and the next time you need it, you'll have it." I have followed this rule my entire adult life, and I think he'd be proud of the tools I've collected. And now, when I need a tool for a project, Well, hey there! I already have everything but the talent to do it right! :D

+1 for the "Upside down and backwards" idea. Sounds nuts, but it does work, once you wrap your head around what that means. Makes for smoother cuts.

Dave


Yes, both of my parents were adamant that you get the right tool. Don't know what the right tool is? This is why you have that favorite hardware store where you know you can get the help you need (Ace was near home I grew up in, True Value is my current go-to).

My father used to tell me "you aren't going to learn this any younger" so I am learning vicariously through you as there is only one room with crown molding, it's beautiful, I'd like to do the others. Keep us posted with trials, tribulations and SUCCESSES!!
 
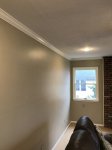
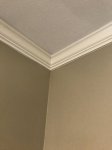
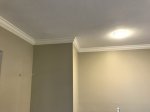
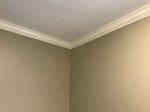
Well I've completed the job!! Really a lot of fun and not as hard as I imagined it would be but still something that takes patience. There are definately some nuances to understand around how to place the molding on the saw to get the right cuts and I took some time and wasted a few boards figuring out my templates to keep reminding me the right way but otherwise I completed the job fairly quickly and for under $170 in material. I don't know how much a contractor would've charged me but I assume i saved myself $200-$300 for my 18' x 13' den.

There are a lot of info on Youtube, some of it confusing but I found one guy who I followed and it became quite easy to make the different cuts and install the product.

I'll have to figure out how to load a picture to show my handy work. My corners, 4 inside and one outside came out excellent. The biggest challenge was connecting corners where the measurements had to be precise as you were measuring angled cuts. What I did was cut it a hair long and then with a razor knife just to shave off the extra so it fit snugly.
 
Well I've completed the job!! Really a lot of fun and not as hard as I imagined it would be but still something that takes patience. There are definately some nuances to understand around how to place the molding on the saw to get the right cuts and I took some time and wasted a few boards figuring out my templates to keep reminding me the right way but otherwise I completed the job fairly quickly and for under $170 in material. I don't know how much a contractor would've charged me but I assume i saved myself $200-$300 for my 18' x 13' den.

There are a lot of info on Youtube, some of it confusing but I found one guy who I followed and it became quite easy to make the different cuts and install the product.

I'll have to figure out how to load a picture to show my handy work. My corners, 4 inside and one outside came out excellent. The biggest challenge was connecting corners where the measurements had to be precise as you were measuring angled cuts. What I did was cut it a hair long and then with a razor knife just to shave off the extra so it fit snugly.

Nice job, Richard! It's always hardest till you've done it. And the more you do it, the easier it will become. :)

(To upload a picture, note that below the window you're typing in, on the right side, is a button to "Upload A File." If you click that, and follow the prompts, you'lll do it easily. The new Forum software makes it easier to add photos than the old software did.)

Dave
 
Nice work, Richard! Now, come do my house. ;)

Dave
 
Top